Sunday, September 23, 2012
World Treasures Peacock
This little peacock is strutting his stuff in Rich Razzleberry! I made this card for a swap earlier this summer and just never posted it. I also made a stepped up version of this card with the peacock entirely embossed with Iridescent Ice but I forgot to take a picture of it before I gave it away. The background was embossed with the Fancy Fan embossing folder.The paper is from International Bazaar Designer Series Paper Pack and the peacock is from Stampin' Up!™ World Treasures stamp set.
Anyone starting on their Christmas cards yet? I just received my supplies so I should be starting soon with at least the cutting. I did make a set of about 40 cards for my 5th & 6th Grade Sunday School class to send out to the Shut-Ins (people in our church who cannot get out because of health or mobility issues). I also need to make my parents' Christmas cards. Guess I'd better put in a movie and get the old Trimmer moving!
Wednesday, September 12, 2012
A Little Fall Triple Time Stamping
I like new techniques! This one looks complicated but is soooo easy! Basically you take 3 pieces of neutral card stock (2" x 3 1/4") (3" x 4 1/4") (4" x 5 1/4") , layer them using a temporary adhesive and stamp on all 3 layers. Then take them apart making sure to keep the images lined up and layer each one on a darker color mat (2 1/4" x 3 1/2") (3 1/4" x 4 1/2") (5 1/2" x 4 1/4" card front) For a youtube video by Dawn Olchefske click HERE. I used the Stampin' Up!™ stamp set called Day of Gratitude. The ink colors are Cajun Craze, Wild Wasabi, Crumb Cake and Elegant Eggplant.
So I finally managed to make about 170 cards to sell at the Apple Festival. This is an annual event to raise money for the Missouri Baptist Children's Home in Peculiar, Missouri. The good news is they all sold, the bad news is someone sold my display box. Oh well, guess next year I will have to write "DO NOT SELL BOX!"
Thursday, September 6, 2012
Perfectly Preserved Tangerine Tango
Tuesday, August 28, 2012
Trifold Card
The idea for this card came from Shelli Gardner (co-founder and CEO of Stampin' Up!™) and can be found HERE. The card base is Crumb Cake and cut 4" x 5 1/4" so it will still fit in an A2 envelope. I used Labels Framelits and Oval Accent Bigz Clear Die to cut the panels using Primrose Petals and Island Indigo. The flower, from the Stampin' Up! stamp set called Fabulous Florets, was water colored using an aquapainter and Stampin' Write™ markers. It is easy to use markers for water coloring and I like the look better. Just scribble a little with the marker on a plastic lid of some kind, the lid of a plastic stamp case works well, and pick up the color with the aquapainter.
Tuesday, August 14, 2012
Glittery Butterflies
I got the idea for this color combo of Sahara Sand and Pretty in Pink after seeing Donna's card here. The butterflies were stamped with Early Expresso ink on Pretty in Pink paper, punched out with the Elegant butterfly punch and glittered with some Dazzling Diamonds™. The layout was from a sketch challenge that I meant to enter but as usual missed the deadline LOL!
Friday, August 10, 2012
Clearance Rack Deal!!!!
Discontinued Designer Fabrics are available for only $.99!!!!! Each package contains three fat quarters 28"x18" of 100% cotton fabric. Available as supplies last. Regular price was $9.95.
|
|||||||||||||||||
Tuesday, August 7, 2012
Shabby Papaya Collage
Here is another card made with the Stampin' Up!™ set called Papaya Collage. I embossed the leaves with Wild Wasabi embossing powder on a panel of Summer Starfruit. The butterflies were embossed with Cherry Cobbler embossing powder and cut out. The paper flower was die cut with the Fun Flowers Bigz die using First Edition Designer Series Paper, sponged with some Cherry Cobbler ink and distressed; an antique brad holds the layers together. The card base is Soft Suede. When it is used on the Summer Starfruit paper, the Wild Wasabi embossing powder almost looks like the retired Stampin' Up! color Sage Shadow.
Well off to bed, I have worked 39 hours in the past 4 days and my everything hurts! I am off tomorrow and I am sleeping in until... well just until I feel like it! LOL!
Tuesday, July 31, 2012
Paper Piercing Pack
Just
a quick post today. I used another vellum butterfly on this card.
Stamped the butterfly with Stazon™ Black and colored it with Stampin' Write markers on
the back. See all that cool paper piercing on the vellum? I used the new
Paper Piercing Pack! Paper piercing is like popping the bubbles on
bubble wrap, you know fun to do but you really don't know why...
The colors used here were Old Olive and Rich Razzleberry. Thursday, July 19, 2012
Embossed Papaya Collage Frame
The card base of this card is one of my favorite neutrals, River Rock. It was an In-Color from Stampin' Up!™ that was retired and brought back during the Color Renovation a couple of years ago. When it retired I purchased 3 packs just in case...and I just opened the last pack.
I embossed the frame and bird from Papaya Collage with Pewter embossing powder and the flower with Cherry Cobbler embossing powder. And yes I did fussy cut the frame.
Tuesday, July 17, 2012
A Little Vellum Butterfly!
This card started with the paper flower, it was in my stash of leftover card parts. What goes better with a Rich Razzleberry flower than a little vellum butterfly? This is one of my newest stamp sets called Papillon Potpourri. There is a matching punch so I did not have to fussy cut the butterfly. I stamped the butterfly with Stazon Black on card stock vellum and then colored on the opposite side with a Rich Razzleberry Stampin' Write marker™. The edge was cut with Adorning Accents Edgelits Die.
Monday, July 9, 2012
Negative Masking
I CASE'd this card from the very talented Gretchen Barron click HERE for her step by step tutorial. Such a great idea! Save those pieces leftover from die cutting and use the negative image. I use removable tape to make sure the mask stays put while you are sponging. The colors on this card are Daffodil Delight and Marina Mist, the sentiment is from Petite Pairs.
So just to let you know it did rain (a little) and it is cooler so did I or didn't I sleep with the fork under my pillow??? Yeah right, me sleep with a fork under my pillow just so it would rain. Sheesh! Wonder why I have a headache today????
Friday, July 6, 2012
Gumball Green and Midnight Muse
Just a quick card today! I CASE'd this card from someone-I just can't remember who...so if it is yours just let me know and I will give you credit. I used two of the new In-colors from Stampin' Up!™, Gumball Green and Midnight Muse. The stamp is from the Stampin' Up! set called Papaya Collage and was stamped 3 times without re-inking. Gumball Green is a nice bright updated green.
So, how hot is it in your neck of the woods??? It's tooo hot here in Kansas City. Over 100 degrees several days in a row and looks like it is going to stay that way for a while! We need rain too, my garden is parched. Tried doing a rain dance but...nothing! I heard that if you sleep with a spoon under your pillow the next day it will snow so maybe if I sleep with a fork under my pillow it will rain?? Or maybe I will just wake up with a headache?
Thursday, June 28, 2012
Vellum Flowers
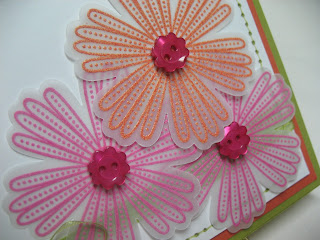
Here is a card we made a couple of months ago at stamp club (see what you are missing?). The flowers are from the Stampin' Up! Mixed Bunch stamp set. I stamped them with Versamark™ and embossed them with Tangerine Tango and Melon Mambo embossing powder. They were punched out with the coordinating Blossom Punch. I paper pierced around the edge of the Whisper White card stock and used a Stampin' Write marker to make the faux stitching.
Vellum is so fun to work with! I like card stock vellum for embossing as it is thicker and doesn't wrinkle as much.
Papaya Collage Meets Riding Hood Red
The main image is the rose stamp from the Stampin' Up!™ set called Papaya Collage. It was colored with Riding Hood Red and Gumball Green Stampin' Write markers and stamped on Naturals Vanilla paper. The little flowers were punched with the Boho Blossoms punch (such a handy punch!) The doily was cut with the Paper Doily Sizzlet Die. I know lots of crafters have had trouble with this die because there are lots of little "hanging chads" and it does take a little bit of effort. However, it is called crafting and should require a little effort on our part, I mean remember the days when we folded our paper and cut out hand-made snowflakes???
I put packing tape across the face of my die, (yep, packing tape across the foam side of the sizzlet) sticky side down and that helps the doily come off the die more easily. Anyway, I like doilies and I like being able to make a doily out of whatever paper I choose!
I spritzed the entire card with some Vanilla Shimmer Smooch Spritz™.
Sunday, June 17, 2012
Daffodil Delight Daisy card
Yellow is such a happy color! Daffodil Delight is a great shade of yellow!
I've had this lovely flower sitting in my leftover-card-parts- pile for quite some time. Because of the already made embellishment this card came together quickly. The flower was made by layering several different sized daisies cut with the now retired Sizzix Daisy #2 die. I used Daffodil Delight paper and sponged the outside of the petals for a little depth. The middle of the flower was made by trimming a small Chocolate Chip daisy and then adding a corduroy button. I bought a bunch of these when they went clearance! The card base is Wild Wasabi layered with a panel of Daffodil Delight embossed with the Framed Tulips embossing folder. No stamping on this card until I decide on a sentiment!
Tuesday, June 12, 2012
Faux Patina
I can't believe I have never done this technique before! It is called Faux Patina and the tutorial by Angie Leach can be found here on Splitcoaststampers. It is very, very easy and you probably have the supplies on hand!
Basically it involves lots of sponging and a little gold embossing. I used Crumb Cake as my base, then added some Not Quite Navy, Always Artichoke and Early Espresso. The last step is to lightly ink with Versamark™ and emboss with gold embossing powder. You must have a light touch or the gold will cover up the sponged on color. I am hoping to experiment with some different color combinations, maybe something with Cherry Cobbler!
Monday, June 4, 2012
Yummy! New stamps, new colors, new toys!!! This is my newest stamp set called Papaya Collage from the new 2012-2013 Stampin' Up!™ catalog. I used Stampin' Write markers to ink the rose stamp, cut it out and used Dimensionals™ to pop it up. There are three of the new In-Colors on this card, Gumball Green, Summer Starfruit and Raspberry Ripple. Here is my inspiration card, made by Sandy Mathis.
I can't wait to emboss the frame stamp-I'm thinking Pewter embossing...
Sunday, May 27, 2012
Happy Birthday Mixed Bunch Medallion
Seems like no matter how much ribbon I buy I don't have the color I need. On this card I simply used the Dotted Scallop Ribbon Border punch to punch a strip of paper that looks like ribbon! The medallion stamp is from the Stampin' Up!™ Mixed Bunch stamp set. I used Stampin' Write™ markers in Pear Pizzazz, Peach Parfait, and Poppy Parade to color the medallion and then spritzed it with a little water to mute the colors. The sentiment is from the soon to be retired stamp set called On Your Birthday.
Tuesday, May 22, 2012
Good-bye Poppy Parade!
A pretty simple card! I used Poppy Parade for the card base. The flowers were stamped with Stazon™ Black and colored with a Poppy Parade Stampin' Write™ marker. They were punched (no fussy cutting!) with the matching Blossom Punch. I added a couple of buttons from my stash, a little retiring 1/4" Basic Black grosgrain and a couple of Little Leaves in Always Artichoke. I don't always stock up on the retiring In-Colors but I did purchase an extra pack of Poppy Parade, just in case.
I am posting this while out of town visiting relatives. I went bowling today for the first time in quite awhile. Let's just say that I did not throw any gutter balls, I did not fall, I got a couple of strikes and broke 100. After not bowling for several years, my goals are simple; keep the ball on the lane and don't do anything embarrassing!
Subscribe to:
Posts (Atom)