Pages

Tuesday, December 21, 2010

Christmas Ornament Swap

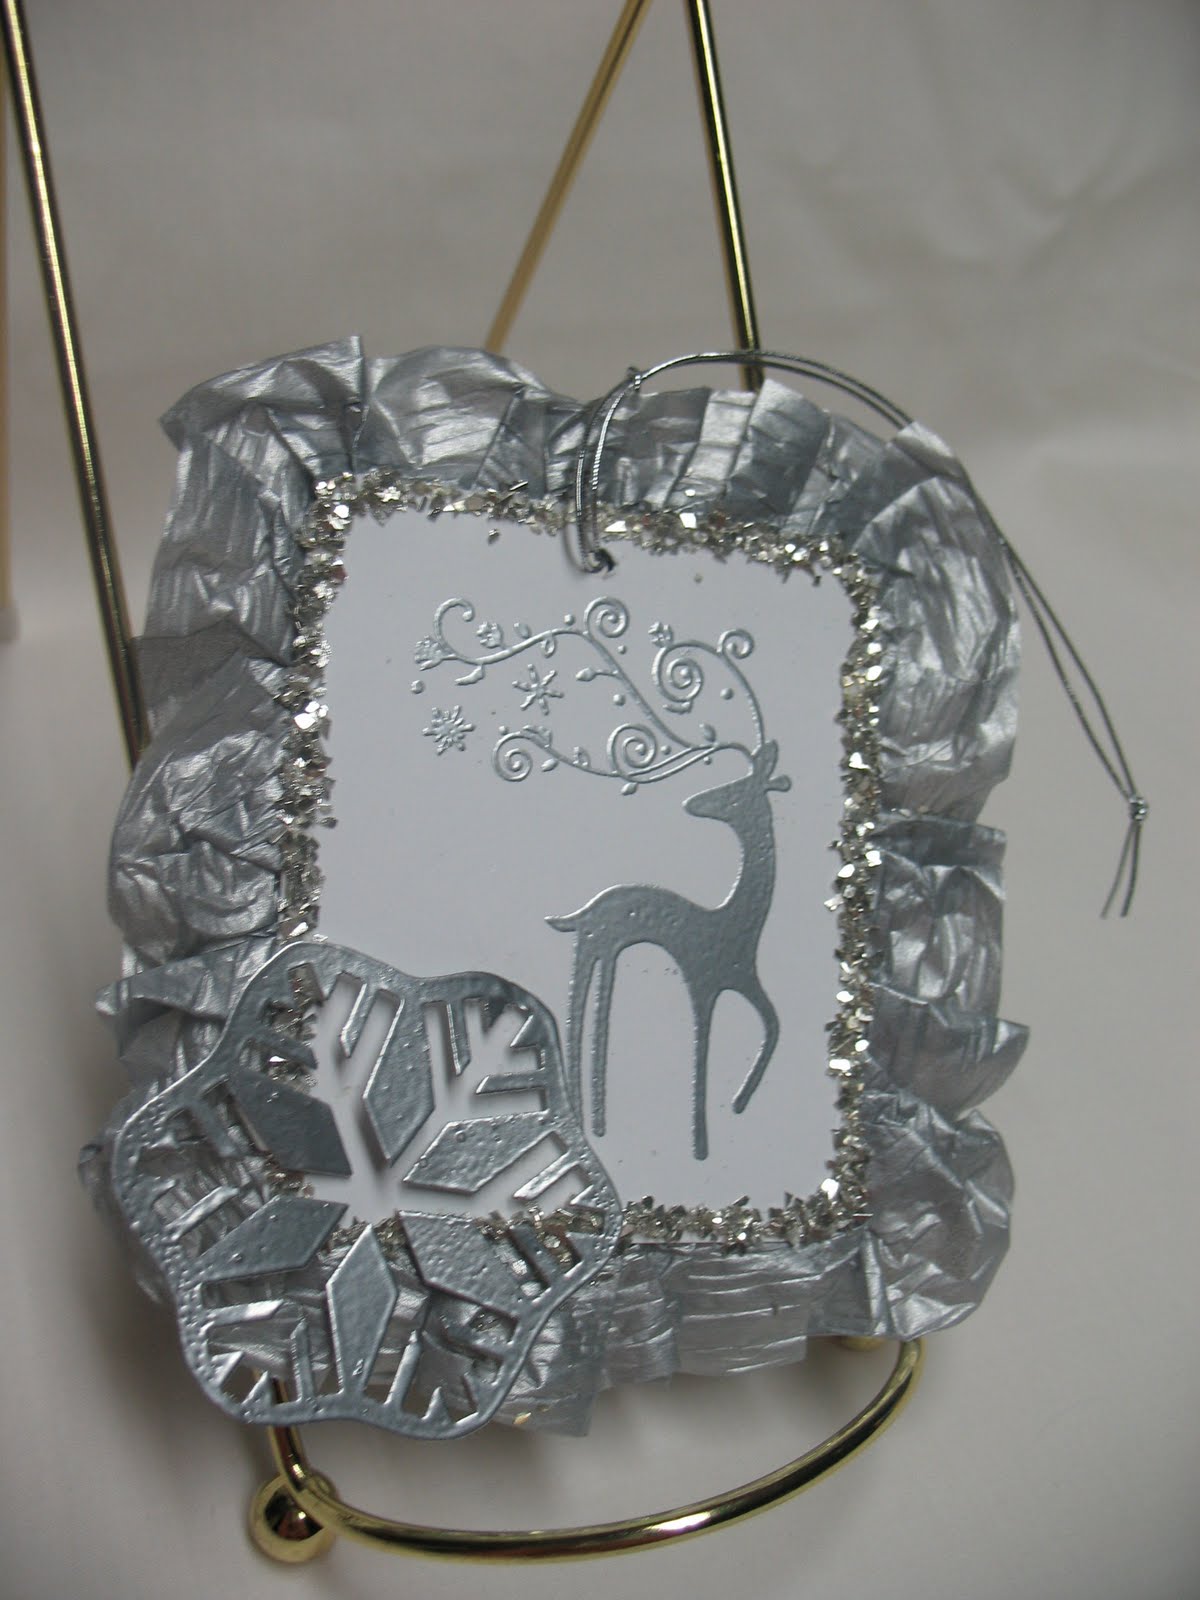
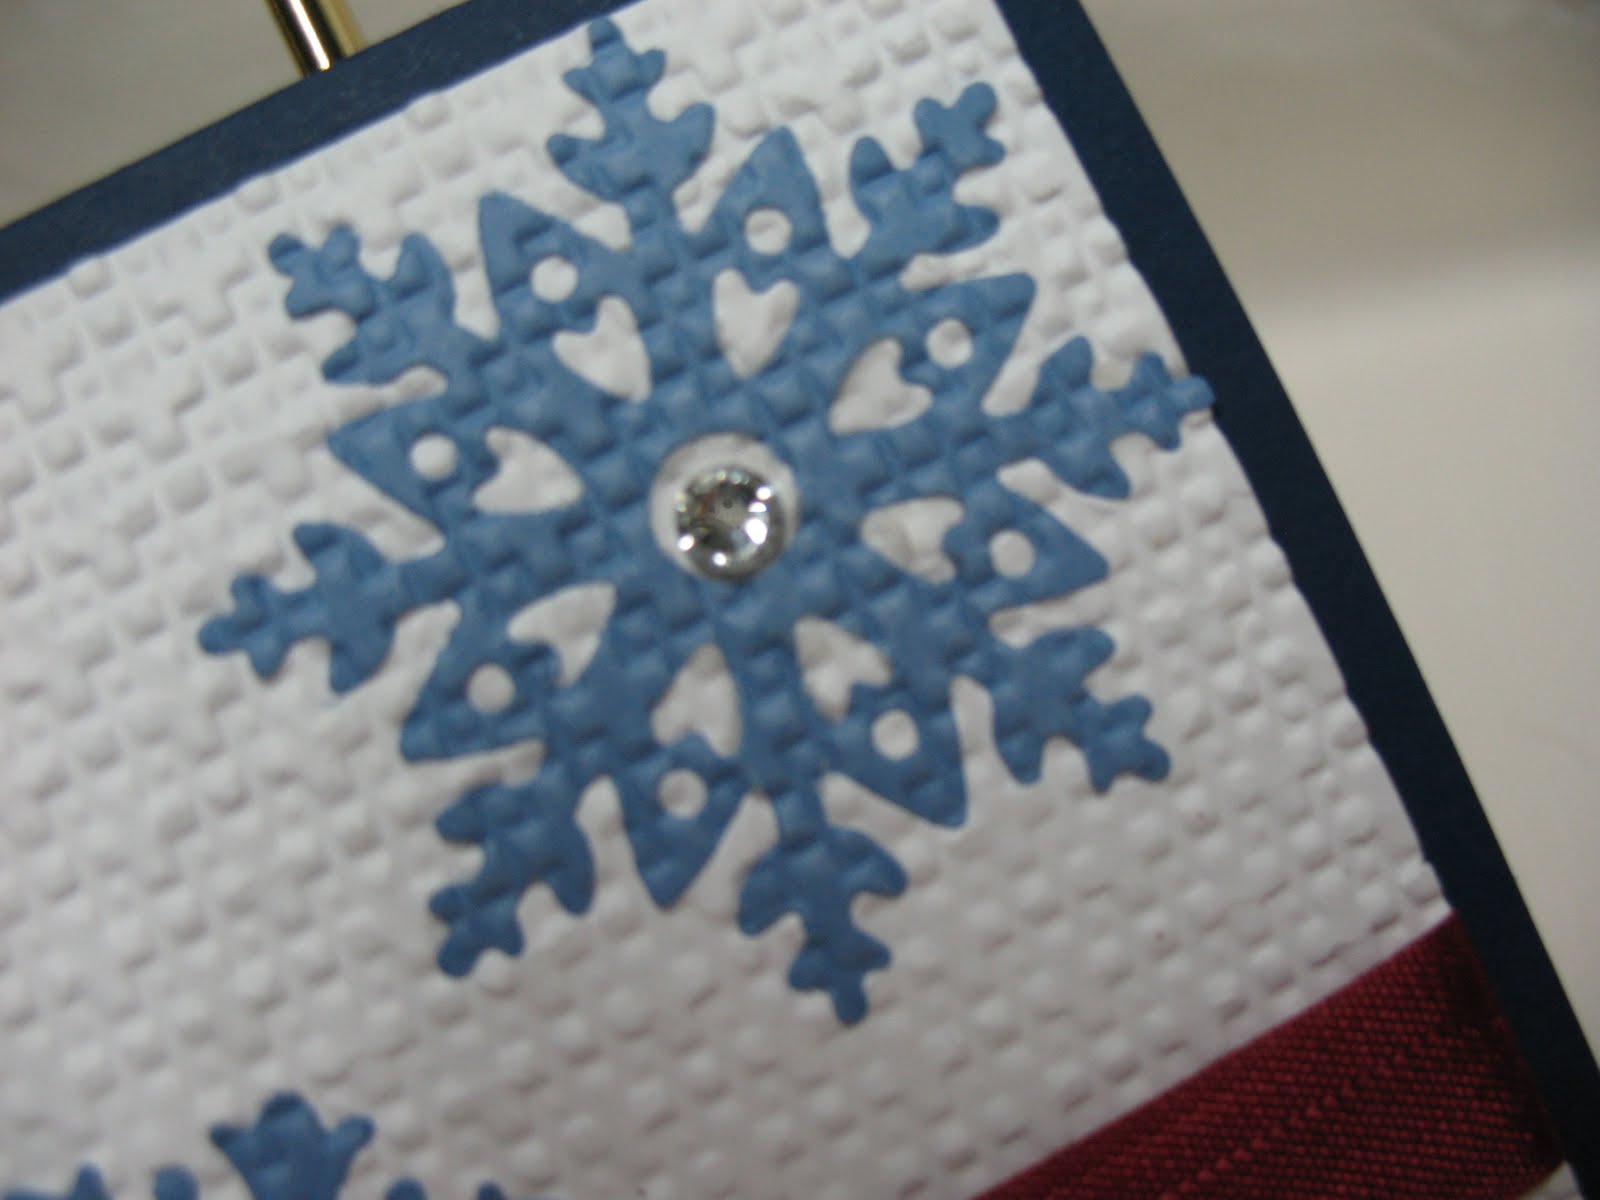
Some of my very creative friends and I had a girls' night out at a local restaurant and swapped Christmas ornaments. Here are the ones that I received. The first one was made by Kris (Collage Contessa) and the one below was made by Trisha (easily amused, hard to offend).

Aren't they beautiful?


They are all so unique! The only sad part is (hangs head in shame), I have not put up my Christmas tree and I don't think I will be able to this year. I just simply ran out of time. Oh well there is always next year right???


Here are the two ornaments I made to share. I used the Deck the Halls DSP and a stamp from Greeting Card Kids. I used blender pens and ink pads to color the image.

Tuesday, December 14, 2010

My Digital Studio Downloads!


My Digital Studio is a digital software program sold by Stampin' Up!. It can be used for digital scrapbooking and soooo much more. You can create digital projects of all kinds, calendars, greeting cards, newsletters or create a hybrid project that includes digital images as well as traditional embellishments.

With My Digital Studio you can print from home using your own printer or have your items printed by Stampin' Up! professional printing facility.

You can also purchase extra downloads of Stampin' Up! images, templates and papers. You don't have to own My Digital Studio to purchase and use these images. They can be used with almost any design application.

For more information click on the image below.

Here are the newest downloads:

To purchase these downloads simply go the www.stampinup.com and list me (Rhonda Langley) as your demonstrator to receive the preferred price. Any questions feel free to e-mail me at rhondastamps@kc.rr.com.

Item Description Image Price
124215 Extreme Snowboard Stamp Brush $0.95
124218 Extreme Surfboard Stamp Brush $0.95
124217 Extreme Skateboard Stamp Brush $0.95
124219 Extreme Dirt Bike Stamp Brush $0.95
124216 Extreme Guitar Stamp Brush $0.95
123991 Style Beautiful Stamp Brush Set $3.95
123992 Lap of Luxury Designer Series Paper $4.95
123990 Elements of Style Stamp Brush Set $3.95
123989 Teahouse Stamp Brush $1.95
123988 Charming Stamp Brush Set $3.95

Saturday, December 11, 2010

Chipboard Ornaments

These are ornaments I made for my Acteens class I teach at church. Acteens is a missions oriented group for girls in 7th to 12th grade. I made these with pieces from ornament kits Stampin' Up! offered a while back. I bought several of these kits when they went on sale for half price. (I can't resist a sale!) The bases are chipboard covered with precut DSP from the kit. I used Stampin' Up! glue sticks to adhere the DSP to the chipboard. I used some Basic Pearls from Stampin' Up, Dazzling Diamonds glitter, Rhinestone brads, felt snowflakes (from the Stampin' Up! clearance rack) and elastic cord to decorate.
I packaged each in a cellophane back with a topper cut with the scallop square die and embellished with DSP covered chipboard pieces.


Monday, November 29, 2010

Candy Cane House

This little house was soooo much fun to decorate once I overcame my fear. I knew I wanted to use this paper from the Candy Cane Designer Series Paper. I used Tombow™ Liquid Glue to glue the house together, to attach the DSP and to decorate the roof. The roof was made with strips of Wild Wasabi that I punched with the Scallop Border Punch. I glued the strips on the roof with a little overhang and then went back and trimmed the edges. The glittered door and shutters were made with Sticky Sheetst. The wreath was a Sticky Sheet I ran through the Big Shot with the scallop circle from the Pennant die. I made the "curtains" with retired ribbon from the Fairy Tale ribbon on the Stampin' Up!™ clearance rack. The snowflakes are also from the clearance rack.


I would have done a couple of things differently. I should have used Whisper White on the back of the Sticky Sheets for the shutters and wreaths to make them easier to handle. Also, I would have decorated the back of the roof before I glued it to the house.


Tuesday, November 16, 2010

Northern Flurry Embossing Folder


Just a quick post of a quick and easy card we made at my Christmas card SAS. The Northern Flurry embossing folder makes this card super quick! I just added a little ribbon and some pearls, stamped Merry Christmas and tah dah! The card base, ink and ribbon are retired Brocade Blue. I did not put a bow on this one so it would be easy to mail!

Sunday, November 14, 2010

Simple Grace Christmas Card


This is one of my favorite Christmas stamp sets. It is one of the few retired Christmas sets that I have kept. The paper is a retired Stampin' Up! paper called Christmas Cocoa. I used Soft Suede to stamp the image and the sentiment which is from the Stampin' Up! set called Rejoicing In Christmas. The ribbon is Soft Suede grosgrain.

Friday, November 12, 2010

Tags Till Christmas Card


Here is another card from my Christmas card Stamp-A-Stack. The card base is the now retired color Mellow Moss. I used the lovely Vintage Wallpaper to emboss the Very Vanilla panel. The stamped ornament is from the Stampin' Up! set called Tags Till Christmas; the sentiment is from Teeny Tiny Wishes. I used some of my stash of retired Purely Pomegranate satin ribbon.
Now that I see this card on the "big screen" I wish I had sponged around the larger panel. For SAS cards I try to keep them quick because we make 30 cards in one night. I love sponging everything but it is time consuming.
Well off to clean; my stamp club is tonight and my stamping basement needs attention!

Wednesday, November 10, 2010

Another Silver Dasher


This is one of the cards we made at the Christmas Card Stamp-A-Stack. See what you missed!!! And just think-you would have your Christmas cards done and it is not even Thanksgiving!

I embossed Dasher and the sentiment with silver embossing powder. When I first started making cards I was in love with embossing. Watching the embossing powder melt as I heated it was almost like magic! Yeah well, like Trisha I am "easily amused". The card base is retired Taken With Teal textured card stock. I punched the snowflake and the scallop oval out of Brushed Silver card stock.

Sunday, November 7, 2010

Dasher Christmas Tag

Look it's Dasher, Dancer, Prancer, Vixen, Comet Cupid, Donder and Blitzen. Donder??? Is that correct? This little gem of a stamp is called Dasher but you could add a little red nose and call him Rudolph; he won't mind!
Dasher was stamped with Versamark™ and embossed with silver embossing powder. I added some of that lovely waffle paper and of course some of the new silver glass glitter found in the Holiday mini.
(only $3.95 a jar!)
The snowflake is the negative image from the Snowflake Punch that I simply cut around and embossed with silver embossing powder. It is actually a piece of Whisper White.
Now originally I did not plan to add the snowflake but I smeared glue on the front of my tag so the snowflake was strategically placed to hide it. I did not take a photo of the back but there is a piece of Basic Gray card stock glued on the back with "to & from" stamped. This is one of the Christmas tags we will be making on Friday!! See what you are missing???????

Wednesday, November 3, 2010

Inlaid Embossing Meets Northern Frost


Don't you just love the background panel? This technique is called Inlaid Embossing. You can use any die cuts or punched pieces to make this. I used the Northern Frost Sizzlet die to cut the snowflakes and glued them on a piece of Whisper White using Tombow™ Liquid Glue. I then ran it through the Big Shot™ with the Square Lattice Embossing Folder. The ribbon is Cherry Cobbler seam binding from the Holiday Mini. This is beautiful ribbon, very soft and supple! The card base is Night of Navy and the snowflakes were cut out of the now retired Brocade Blue.

Monday, November 1, 2010

Stampin' Up! Gold Waffle Paper


I finally broke out my waffle paper and actually used it! It is thicker than I thought it would be and easy to work with. In order to ruffle it around the stamped image I cut it in vertical strips and used a couple of small pieces rather than trying to work with one long piece. When it is finished you cannot see the seams.
The stamped image is from the set called Tags Till Christmas found in the Holiday Mini. The glitter is the new yummy, sparkly Champagne Glass Glitter. I love this glitter (okay I love any glitter)! I used Tombow™ Liquid Glue to adhere the glitter. One really nice thing about this glitter is it will age over time giving your project a vintage look. The little branches are a Martha Stewart™ Punch. The Cherry Cobbler panel was embossed with the Vintage Wallpaper embossing folder and spritzed with Shimmer Paint mist.

Monday, October 25, 2010

Stampin' Up! Nature's Nest

Look! I made another masculine card! I am slowly but surely adding some manly cards to my stash. The turtle is from the Stampin' Up! set called Nature's Nest. This was one of the first sets in the new catalog that I put on my wish list; but it took me this long to actually purchase it. I colored the turtle with my watercolor pencils and blender pen. The card base is Crumb Cake with Early Expresso and Cajun Craze panels. The scallop is Naturals Ivory embossed with the Square Lattice Embossing Folder and punched with the 2-3/8 Inch Scallop Circle Punch. I added a little piece of some retired (but it is still on the clearance rack!) twill tape, and a few pieces of Early Expresso Word Window punches.


Friday, October 22, 2010

My first Build-A-Bear Card!


This little fellow was just lying on my stamping table waiting on a permanent home. I hate to admit it but I have owned these Build-A-Bear™ dies for several months and have only played with them once. It's an addiction I tell you, you know the I-need-everything-new-in-the-catalog addiction and I need it yesterday!!
I am still trying to add to my stash of guy cards. Although this would probably have to be for a young guy-not sure an older guy would appreciate a Build-A-Bear LOL! The bear is cut out of some retired Creamy Caramel and the jacket is retired Close to Cocoa. I used embroidery floss for the shoelaces.


Monday, October 18, 2010

Just Percolating!

The first time I saw this set I knew I had to have it. I especially love this funny sentiment, "caffeine isn't a drug, it's a vitamin!" Too bad it isn't true LOL!

I used my Stampin' Up!™ watercolor pencils and blender pens to color the images and then painted on a thin coat of Crystal Effects™. It is hard to tell in the photo but the top of the percolator has a little drop of CE for the glass stopper.

The ribbon is the last of my stash of retired Riding Hood Red taffeta-love this ribbon! I wish we had this in every color! The card base is Marina Mist and the Basic Gray panel was stamped with Basic Gray ink.

Friday, October 15, 2010

Cajun Craze Day of Gratitude!

The weather here in Kansas City is absolutely beautiful-sunny & 70! I am going to work out in the yard today. It is just too lovely to stay inside!

Tonight we are going to ride the roller coasters and walk through the haunted houses at Worlds of Fun™. I must confess that I am a chicken when it comes to haunted houses.I am not sure how many I will be brave enough to walk through.

Cajun Craze is such a great color for fall cards! I used Cajun Craze and Naturals Ivory paper for this card. The twill ribbon was stamped with the acorn stamp using Cajun Craze classic ink. The background was made by stamping the leaves with Cajun Craze ink.

I am trying to add a few masculine cards to my stash.

I do think I should have added a little hardware-maybe a couple of brads or something. Oh well!


Monday, October 11, 2010

A Cupcake????

Isn't this just the cutest???? This was a project I made at a shoebox swap sponsored by my 2nd level upline, Debbie Menez. Bet you can't guess what is rolled up in the middle????? Give up???

It is a SOCK! You simply fold a sock in half and roll it up. The paper is a strip of DSP that was run through the crimper. The "cherry" is a red pom-pom. We made these at one of my stamp clubs-see what you missed out on by not attending????? Cupcakes with zero calories and I didn't have to cook to make these!!

Sunday, October 10, 2010

Blog Award!


I have been given the "Cherry on Top" blog award from Kari at Pigtail1's Paper Patch . Thanks so much for the compliment and award!

The rules for receiving this award:

1. Thank the person that passed it to you.
2. Copy the award to your blog.
3. Share three things about yourself that you enjoy doing.
4. Pass the award to 5 others.

Three things I enjoy doing are:
1. Reading, even though lately I don't read as much as I would like. I enjoy reading lots of different books but my favorites are usually mysteries.
2. Just being outside! I love watching the birds and listening to the all the insect sounds and digging in the dirt!
3. Papercrafting of course!

I am passing this award on to:
1. Sharon Stamping & Musing
2. Lois Country Stampin Oasis
3. Vicki It's A Stamp Thing
4. Trey All Natural Stamping
5. Renee My Lifes Inky Escape


Tuesday, October 5, 2010

Stampin' Up! Pun Fun


I finally participated in a sketch challenge only I didn't make the deadline for the giveaway! Go figure???


This is for Splitcoaststampers Sketch Challenge #300. Here's the sketch:


I pulled out a set I have not used for awhile called Pun Fun, great set of cute images. I colored the rocket ship using my Stampin' Up! watercolor pencils and a blender pen on Whisper White paper. The background paper was stamped with Garden Green and Pacific Point using the Extreme Elements stamp set.

I really need some birthday cards for boys in my stash. Actually I need some masculine cards period in my collection. My challenge this month is to make one masculine card for every feminine one I make-I should make two masculine for every one feminine but ...hard to give up the bling and glitter!


Related Posts with Thumbnails