skip to main |
skip to sidebar
 I thought I would take a break from making Fall and Christmas cards and make one with my favorite color! The card base was cut with the Sizzix Curly Label Movers & Shapers die and the inside is the Top Note die. I used Pixie Pink textured card stock and Pixie Pink ink. The bunny is from the cute little set called Forest Friends. The sentiment is from an old retired set. The ribbon is from one of the retired Ribbon Originals and is actually the first time I have used it. I think now I really need some more of those other windows that fit in the Movers & Shapers die.


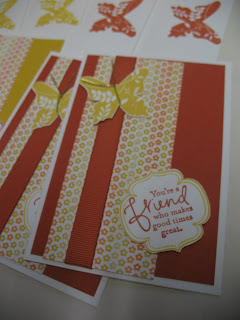 Here is another quick gift for Christmas or any occasion. You could also give a tin of Christmas thank you cards to be used after Christmas. I decorated yet another skinny tin; this time with note cards to match. It is hard to tell in the photo but behind the cards are envelopes that have been stamped. I didn't want the cards to be too "bumpy" so they would fit in the tin so I just wrapped the ribbon around without tying. These note cards are smaller than the regular A2 quarter fold cards but they are a great bargain. For only $5.95 you get 20 cards and envelopes. Four cards and envelopes fit nicely inside the decorated tin. I think I will make several sets of these in different colors to have on hand as a quick gift. You could sneak a little cash inside, place them inside a basket with some lotion & body spray or just give them alone. Stamps: Great Friend
Ink: Dusty Durango, Crushed Curry
Paper: Dusty Durango, Crushed Curry, Raspberry Lemonade DSP
Accessories: Dusty Durango & Crushed Curry Grosgrain, Gold Elastic Cord
 I just can't help myself-that shimmer paint is just plain habit forming!
The snow was made by tearing Whisper White paper into strips and painting them with Frost White shimmer paint. After I arranged them on my Real Red card base I simply trimmed them to fit and added some Dazzling Diamonds to the torn edges. The trees are from Patterned Pines, a level 1 hostess set, the sentiment is from Christmas Classics, the snowflakes are from Serene Snowflake and the presents are from a retired SU set. The trees were inked with Garden Green and daubed with shimmer paint.
 The first year I stamped my Christmas cards was not pretty because I waited until December 10 to even start. The first 5 or so were not so bad but I wanted glitter on them (Night of Navy cardstock, angel stamp you know it screams glitter!) and I didn't know about the 2-Way Glue pen so I was using Elmers-yes I said Elmers. Do you know how long it takes for a blob of Elmers to dry????? FOREVER!!!!! And I was under a deadline-how fast can the Post Office deliver these and I had a gift exchange to go to AND THIS IS MY LAST FREE NIGHT UNTIL CHRISTMAS!
Anyway I soon gave up the glitter (GASP!) and made my cards groaning and complaining about how this was so not fun!
When I handed out my cards I put them in envelopes then put the names on them so some people got glitter some did not but no favoriticism just blind chance. Okay there is a purpose to this story. After that I promised myself:
(1) I would make my Christmas cards early!
(2) They would be fun to make!
(3) They would have glitter and/or bling (with a 2-Way Glue Pen not Elmers!) so
MY CHRISTMAS CARDS ARE FINISHED!!!!!! ALL 75 OF THEM!!!!! In celebration I am eating the last of the Halloween kisses!!
 Hope you had a Happy Halloween and didn't eat too much candy! My kids (ages 20 & 17) had a few friends over Friday night. Many of them actually came in costume. My DD bought some strobe lights, a ghost that "flew" across the room and other scary decorations. Everyone seemed to have fun-they drank a lot of pop, ate a bunch of candy and chips and played games!
Ugh! I didn't realize this was hanging crooked! I took these photos outside and I couldn't see the screen of my digital camera and as usual I was in a hurry. Oh well you get the idea!
This was a very fun project! Most of the things I make are for classes, clubs or swaps and while I love making them it was nice to make something just for fun. I could use my retired stash, I didn't have to think if I had enough pieces to make enough swaps, what is on special, etc, etc. I could just play!
The panels are chipboard odds & ends that I ran through the Big Shot with the Top Note Die. The paper is from Cast-a-Spell and I used a glue stick to adhere them to the chipboard. The letters are from the On Board Simon lower case that are on clearance. Because this set of letters only has one of each I did have to create and extra "e" from a "c" and an extra piece. I also made an "l" by cutting off part of a "k". I used craft ink spots to color the letters. I don't have Perfect Plum craft so I inked a layer of Elegant Eggplant and when it was dry inked a layer of Lovely Lilac.
I used my only (gasp!) Halloween set for a couple of the embellishments. It is SU but retired. The owl is chipboard covered in DSP with Kiwi Kiss corduroy button eyes (actually the paper color is Old Olive but don't tell anyone!) with a couple of punched out black circles. The metal pieces between the panels are jewelery spacers that I used on another project.


